When it comes to selling on Amazon, two key factors can increase your earnings.
Firstly, sourcing high-profit products that you can sell on Amazon.
Secondly, and this is especially important, you need to list your items quickly, ship as many products as possible, and rinse and repeat.
Here is where tools like Go2Lister come in handy.
Go2Lister is a useful tool for Amazon product listing.
In the world of Amazon selling, powerful listing tools like Go2Lister are indispensable.
We consider it one of the most effective Amazon listing tools available.
In this blog, I'm excited to share with you a step-by-step guide made just for making your product listing on Amazon faster.
This last year, I made over $500,000 from Amazon Sales. My monthly profit is now more than $13,000.
A big part of this success is due to this software my friend Avery has made called Go2Lister.
This tool has completely changed the way I handle my Amazon listings and shipments.
In this step-by-step guide, my friend Avery will guide you through each feature of Go2Lister.
He'll take you through how to get started using Go2Lister, how to list your first item, how to scan your products into the system efficiently and guide you through the entire process.
With Avery’s expertise, you will learn how to use Go2Lister inside out and optimize Amazon product listing.
It's vital to think past just the free Amazon Seller Central app if you want to increase profits and save time.
Using third-party software like Go2Lister costs money but is well worth the investment.
It improves speed and effectiveness, plus its smart pricing option can greatly boost your income.
To help you start, use this special link for a longer free trial of Go2Lister.
Believe me, this could be a game-changer for your Amazon business.
In this easy-to-follow guide, we'll explain each feature of the Go2Lister software.
Starting with an overview of the settings to familiarize you with the interface, we’ll guide you through listing items and creating a batch.
After that, we’ll show you how to create a shipment and send your items to Amazon in the most cost-efficient manner.
Finally, we’ll explain how this software can give you insights into your profits.
This software not only tracks the purchase price of your products – it also keeps an eye on how much they sell for on Amazon.
This means you get a daily update of your actual net profits.
Watch the Video below:
(Click here to watch on YouTube)
Getting Started
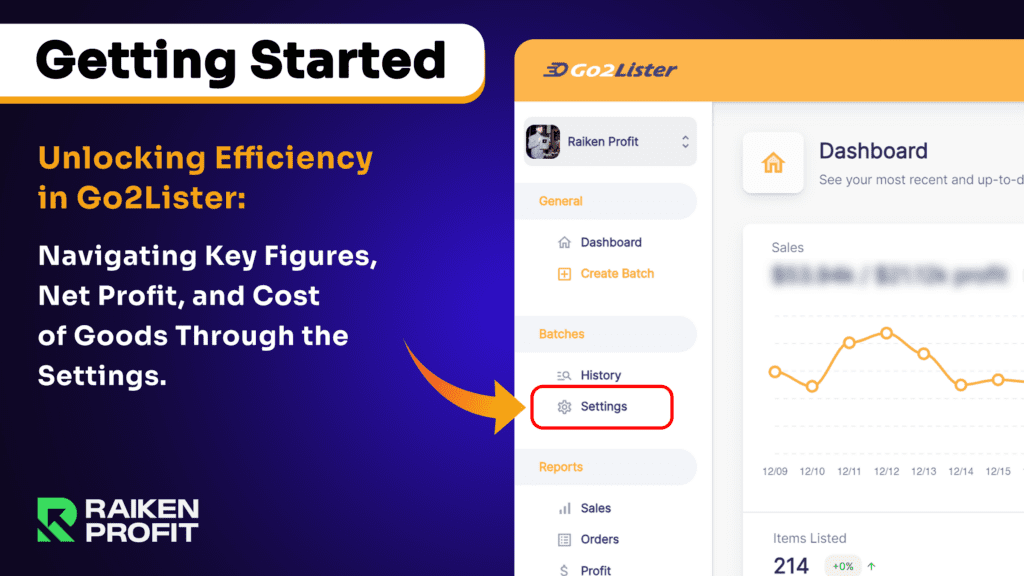
The first step is to log in.
Once you're in, you'll notice two key figures: net profit and cost of goods.
These numbers are for all the products you have already listed on the platform.
If you're a new user of Go2Lister, these figures will initially be at zero.
To effectively use Go2Lister, understanding its settings is crucial. Start by accessing the 'Settings' option. Here's a step-by-step guide:
- To get started, you need to find an option called ‘Settings,’ which will be located in the left part of the Go2Lister interface, among other items, under a section named ‘Batches’.
- Click on the ‘Settings’ option, and a set of tabs will appear on the right-side screen.
- Click on the tab labeled “Address” from these tabs, this should be the first one.
Batches>Settings>Address
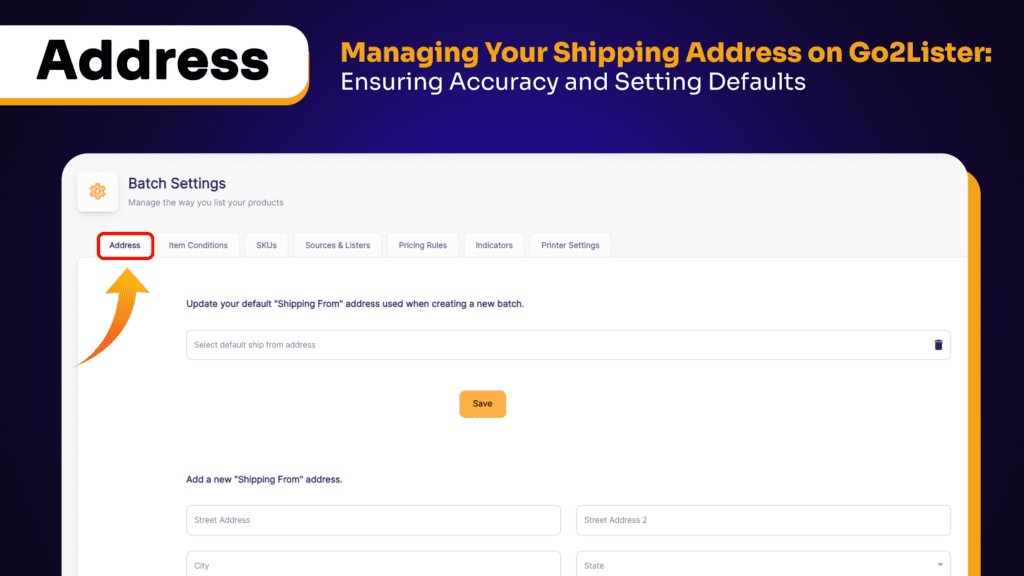
In the Address section, make sure your shipping address is up-to-date.
This is the address from where you'll be sending your items to Amazon.
This could be your house, a warehouse, or even your mom's house.
While you can enter many addresses in this section, it is important to set a default address.
This way, every time you create a new batch, Go2Lister will automatically use this default address.
Batches>Settings>Item Conditions
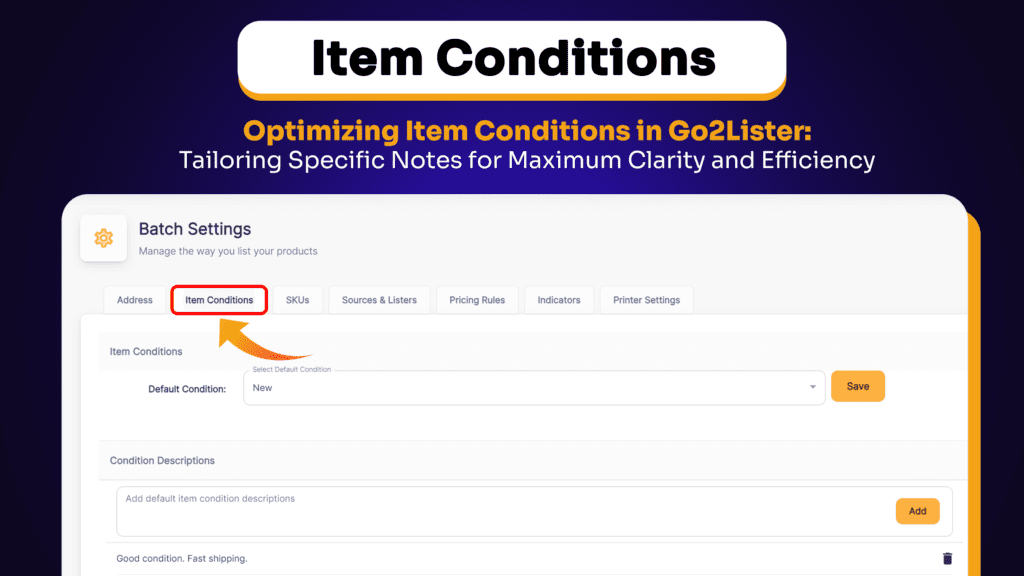
The next tab under Settings is Item Conditions.
In Go2Lister, you can add specific condition notes for your items, such as books.
A common practice is to use a generic note like "Satisfaction guaranteed.
Shipped directly from Amazon. Thank you.
This note is generic enough to suit various conditions – whether the book is listed as 'like new,' 'acceptable,' or 'good.'
It's a simple yet effective way to cover the condition of your product.
But, for some things, it is good to use more specific condition notes.
For instance, old library books and items with special qualities like signed copies or special packaging.
If you often need to add special notes for certain things, Go2Lister lets you save these.
You can use them again later when needed.
This feature makes sure your special notes about conditions are saved and can be quickly used when making new batches.
You can change these condition notes straight from the batch.
This lets you make changes in real time when necessary.
Batches>Settings>SKUs
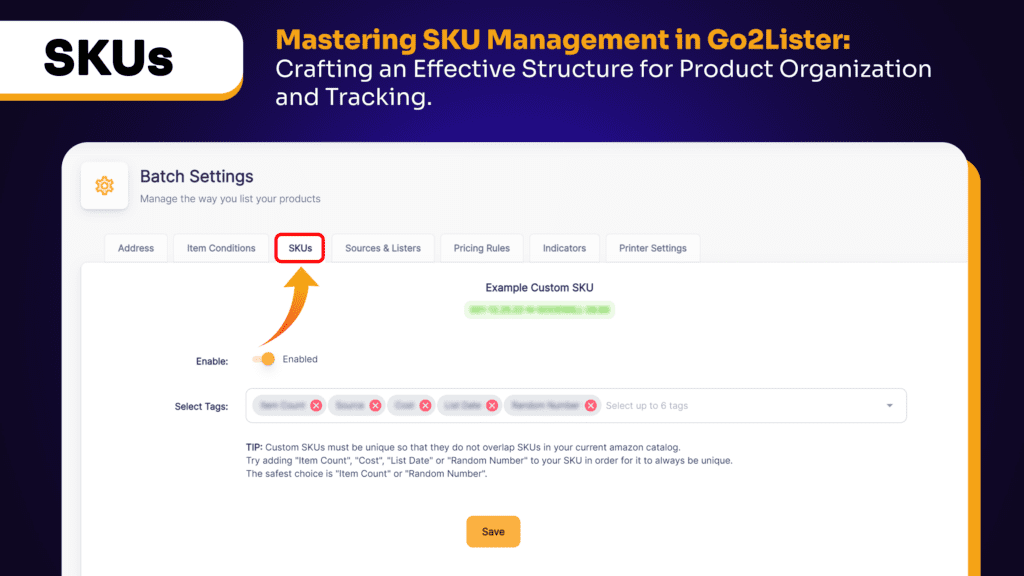
In Go2Lister, taking care of your Stock Keeping Unit (SKU) is a very important part.
It's a good idea to use an SKU format that gives important details about each product.
Here's a structure you might find helpful:
- Date of Listing: Knowing when you added the item can be very important for watching how it does over time.
- Purchase Price: Include how much you paid for the item.
- Source of Purchase: State where you acquired the item from, be it Goodwill, Savers, or another source.
- Random Number: This is a vital component. Amazon requires each SKU to be unique across different ASINs (Amazon Standard Identification Numbers). By incorporating a random number, you ensure that every SKU is distinct. Our software will not allow duplicate SKUs for different ASINs, so this step is non-negotiable.
For booksellers, this special SKU structure is very important.
If you're mainly doing online arbitrage, think about making the SKU simpler.
In most cases, it's usually best to keep this amount of detail.
Also, there's the feature called 'Item Count'.
This is particularly handy if you’re printing over 30 labels or so.
It keeps your labels organized 001, 002, and so on.
However, if you use a regular printer and want to have 30 or more labels, you should consider adding an item count at the start of your SKU for better organization.
This is useful for organization and clarity, especially when dealing with a large number of items.
Batches>Settings>Sources and Listers
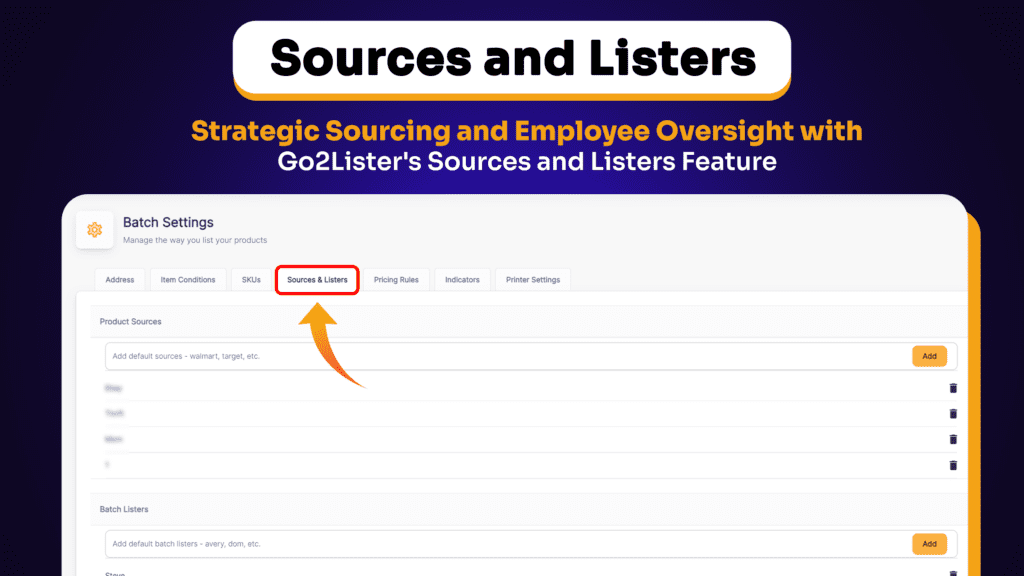
The Sources and Listers feature helps you keep track of your product sources and manage the employees involved in the listing process.
Here's how you can use it:
- Record Your Sources: Here, you can input all your product sources. This could be places like Walmart and Goodwill. Keeping a detailed record of where each product comes from is very important for tracking your inventory. It enables you to know the most profitable sources.
- Employee Management: You can also update and manage your employees in the system. This is especially useful in order to monitor who lists what. In case of issues with a product, for instance, if it’s faulty or counterfeit, you can easily track back to know who is responsible for the listing. This reporting feature is essential as it helps with quality control and addresses any issues in a timely manner.
Batches>Settings>Pricing Rules
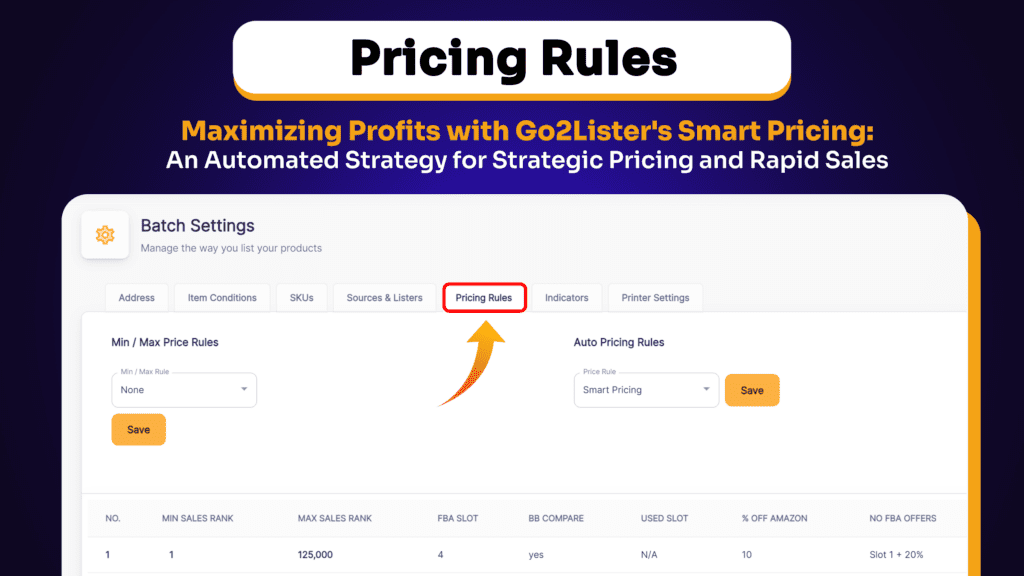
The smart pricing function within Go2Lister is pretty compelling, especially for booksellers.
This also applies to CDs, DVDs, and other categories.
This feature helps in maximizing profits on fast-selling items by automatically adjusting the prices based on sales velocity.
Here's how Smart Pricing works in Go2Lister:
- Fast-Moving Books (Sales Rank 1 to 125,000): Books that have a sales rank indicating a high demand are priced automatically by Go2Lister as being equal to the fourth lowest Fulfillment by Amazon (FBA) offer. This is if Amazon does share this information with third-party software.
- Moderately Fast Books (Sales Rank 500,000 to 900,000): In this range, Go2Lister prices the books at the second FBA slot.
- Slower Moving Books (Above Sales Rank 1 Million): The software prices these books at the buy box or the first FBA slot. If there are no FBA offers, Go2Lister will automatically set your book's price 20% higher, taking advantage of the lack of FBA competition.
Additionally, the software alerts you when there is no FBA competition.
This represents an opportunity to manually price the book higher for potentially double or triple profits.
Go2Lister highlights these books in purple.
This indicates that you should manually adjust the price upwards before submitting your batch.
This Smart Pricing strategy is particularly beneficial for those with a large inventory, such as hundreds or thousands of books.
However, in such cases, it is not feasible to check each product and mention its price manually.
By utilizing this automated pricing system, you can rest assured that your inventory is priced optimally to maximize quick sales and profitability.
Batches>Settings>Indicators
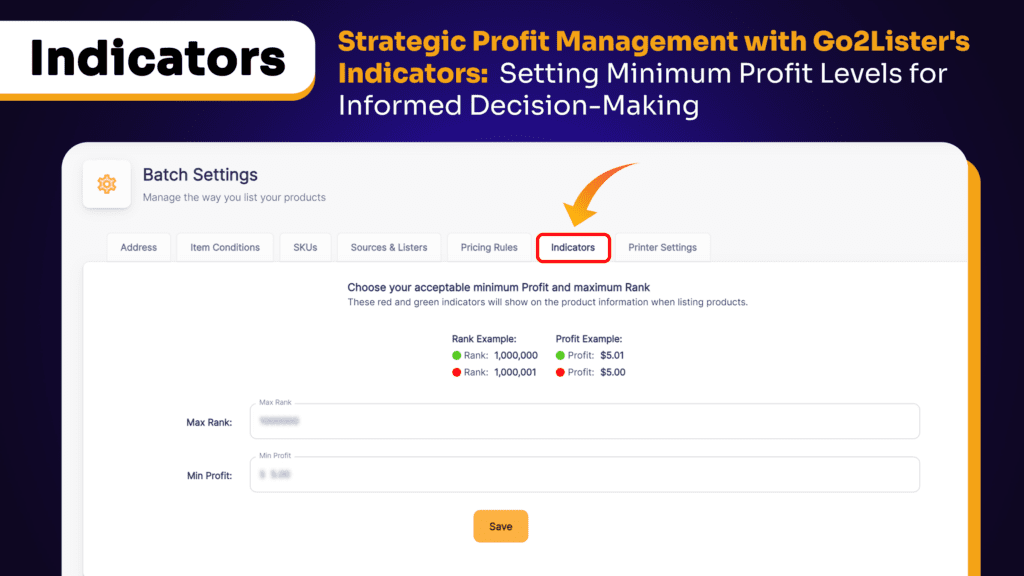
Another feature in Go2Lister is the ‘Indicators’, which is incredibly useful for ensuring profitability.
You can also use this function to indicate a minimum profit level for each item. Here's how it works:
- Profit Threshold Setting: You can set a minimum profit value for each item – the lowest amount of profit you're willing to accept. For example, setting this threshold at $5 will highlight any item below that price margin.
- Printer Settings: In Go2Lister, you can change and switch between various printer settings to meet the needs of your selected printer. This makes sure your labels print out right, and they match well with what you're labeling.
If you want to use a Rollo printer, click here for a full setup video.
- Regular Printer Option: If you don't have a special label printer, Go2Lister also works with regular printers that use '30-up labels'. But, when using this way, you will need to get your labels from Amazon Seller Central instead of directly printing them at Go2Lister.
Creating Your First Batch
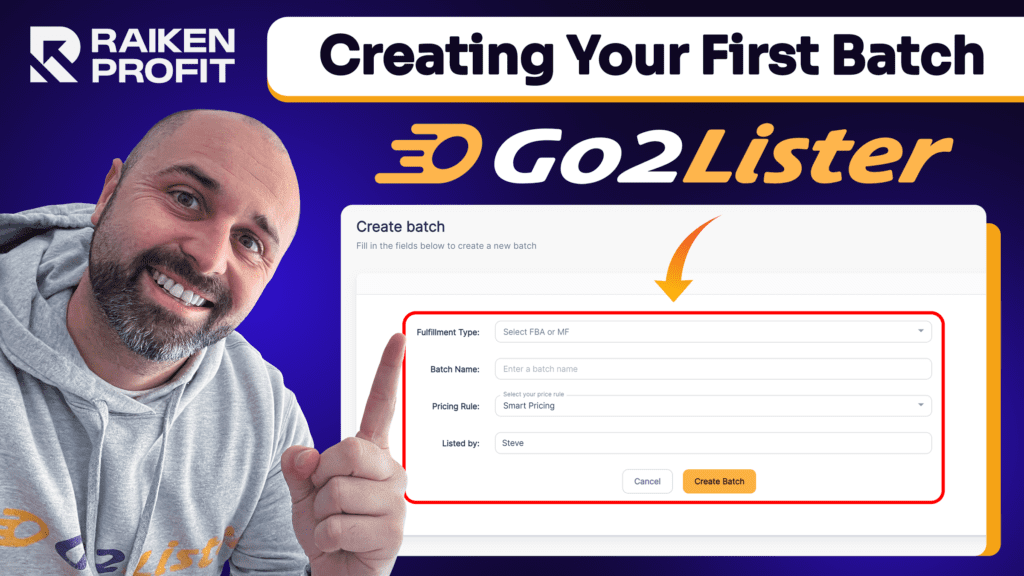
General>Create Batch
To get started organizing your items for listing, you’ll want to go into the Go2Lister program and head over to the ‘Create Batch’ feature.
Here's how you do it:
- In the left pane of the Go2Lister interface, find the General section and click on it.
- Find and click on ‘Create Batch’ under this section.
Fulfillment Type: FBA or MF
Let's concentrate on making your first batch in Go2Lister.
This is a very important part for sellers using Fulfillment by Amazon (FBA).
Here’s a guide on how to proceed:
- Choosing Your Fulfillment Method: Most users send their items to FBA. But if you like the Merchant Fulfilled (MF) or Fulfilled by Merchant (FBM) way, Go2Lister also helps with MF ticketing. Click here for a complete video that shows how to use MF tickets.
- Focusing on FBA: In this guide, we focus on the FBA method. It's most commonly used by Go2Lister users, and it is what we will be concentrating on here. FBA is the top pick for many sellers because it makes things easy and fast. They don't have to worry about storing goods, sending them out, or helping customers with issues.
Batch Name:
In the batch name, you want to include something clearly identifiable.
We use the name of the person listing, then followed by when an item was listed.
For example, you could use your name or your employee’s name along with the listing date, such as “John04012024”.
Pricing Rule:
The 'Pricing Rule' setting offers two options: 'Match Buy Box' and 'Smart Pricing.'
- Match Buy Box: This option adjusts your prices to be in line with Amazon’s live Buy Box pricing. The Buy Box is the box on a product detail page where customers can begin the process of buying a certain product. By doing this, you bring your price in line with what the current market leader is charging, and that can be a reliable approach for staying competitive.
- Smart Pricing: A more dynamic approach is taken in this regard. Smart Pricing enables you to adjust the prices of your books or other products according to their demand. For items with higher demand, the system automatically sets a higher price. It is especially advantageous in profit maximization, as it capitalizes on market dynamics and patterns of consumer demand.
Listed by:
- In this field, enter the lister’s name. Go2Lister records every single name of employees or listers you include. This is a useful feature for businesses that have more than one employee responsible for creating listings.
Shipping from:
The ‘Shipping from’ field is used in order to specify the address of shipment origin.
This could be your home, a warehouse, or any other place you use as a shipping point.
This will ensure the shipping information on each batch is accurate.
Who labels:
The ‘Who labels’ section offers two options as follows:
- I want to label my products (recommended): Self-labeling is often suggested since doing so gives you more control over the labeling process, and it can be less expensive.
- I want to pay Amazon $0.30+ per item to label for me: This option means that you want Amazon to label your products for you. But this service will cost at least 30 cents for each item. This fee can accumulate, especially if you have a high volume of items to sell, which makes it a more costly option.
Do not forget to click the ‘Create Batch’ button after you have entered all of the above information.
This completes setting up your new batch and starts the process of organizing and preparing your items to be listed on Amazon.
Next, the system will ask you for the ‘source’ of your item.
- Source: In Go2Lister, you need to tell the program where each product comes from, such as Walmart or Kohl’s. In case you do not know the source or wish to keep it without specification, please enter a dash (-) in this field. Effective business analysis and decision-making depend upon a correctly cited source.
Buy Cost: You should keep an eye on how much you pay for what you buy. If you don't want to track it, just put zero.
However, it's a good idea to know how much you paid for something so you can keep track of your profits correctly.
To find out how much one item costs in a batch, you need to split the total price of all items by the number of items in that batch.
This helps you know what the average price for each item is, which is important to know your profit margins.
Condition Description: You can change the condition of your items, with options ranging from ‘acceptable’ to ‘new.’ If an item is listed as new, Amazon doesn’t require a condition note.
Using generic condition notes makes the process easier. They usually work well for most things you need to list.
But, in case there are particular problems or amazing features about an object that need to be focused on by the buyer, extra comments should be made.
A good example of this kind of note is "Satisfaction Guaranteed. Shipped from Amazon. Thank You." This type works well for different conditions, not just 'like new' but even up to what is 'acceptable.'
Using a note like this takes care of most situations.
Listed by: Just type the name of the person who listed the items.
This helps us know who is in charge of listing each item, making sure people stay organized and can be made accountable if something goes wrong with the inventory.
Auto Print: This feature is designed to streamline the labeling process.
- Auto Print ON: When turned on, this feature prints the Fulfillment Network Stock Keeping Unit (FNSKU) label as soon as you scan a book. You can then quickly put a label on the book, making it easy and fast.
- Auto Print OFF: If you don't want to put labels on your books right away or plan to do it later, you can turn this function off. This choice is helpful if you decide to deal with the stickers during packing things into boxes or at a later time.
- Print Error Labels: This function is made for times when you may need to list things fast. If you turn it on, it creates labels for books or things that have problems like being restricted, missing size details and other mistakes.
By default, 'Print Error Labels' is turned OFF. This means that print labels won’t print unless you decide to turn this option ON.
Using 'Print Error Labels' can be very helpful if you want to quickly fix any problems with your items during the scanning process.
This is especially important in a fast-paced work environment.
Allow Restricted Products: This feature makes it possible to list items in categories you are currently restricted but expect approval (ungating) by Amazon soon.
It's important to use this function with care, making sure you will probably get the needed permissions from Amazon.
Use Unique SKUs: This feature relates to Amazon's terms of service and allows you to tailor your SKU management to your business needs.
- Amazon’s Terms of Service: Amazon says that no ASIN should have more than one SKU. But, a lot of book sellers including myself do not always follow this rule carefully.
- Unique SKUs Option: When this is turned on, each product you list will have a unique SKU. If turned off and you list the same product again, Go2Lister will reuse the first SKU assigned to that product.
- SKU Consistency: Be aware that if you reuse SKUs, the SKU may not reflect the current source of the product. For example, if the original SKU included 'Walmart' and you later acquired the same product from 'Goodwill,' the SKU will still display 'Walmart,' even though the source has changed. Go2Lister tracks the correct source, but the SKU remains as initially assigned.
- Support and Queries: If you have any questions or confusion about SKUs or any other features, you can reach out through the Facebook group, email support at support@go2lister.com, or use the live chatbot on Go2Lister's website for direct help from the team.
How to Scan Your Items
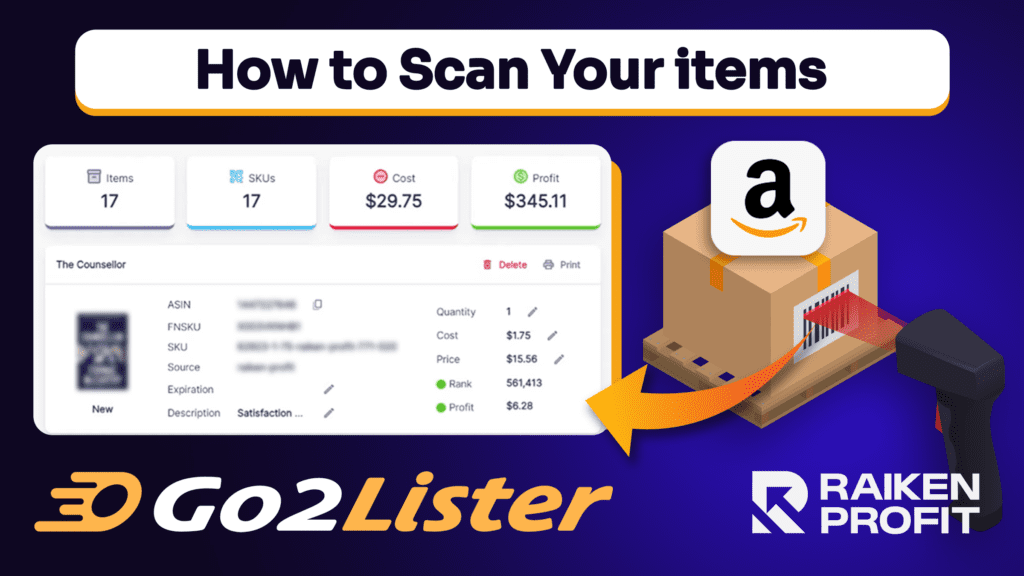
Go2Lister's scanning ability is made to increase how fast it works. It lets you quickly make a list without the usual waits that come with Amazon's FNSKU replies.
- Preparation: Once you’ve set up your batch and source, you’re ready to start scanning.
- Scanning Speed: Go2Lister is special because it scans very quickly. It's made in a way that lets scanning happen quicker than Amazon replies for FNSKU. This feature overcomes the common frustration of ‘waiting’ for Amazon browser response which could take anywhere between 2 to 20 seconds.
- Queue System: The software is designed to queue your scans. You can just keep quickly scanning items one after another, without having to wait on Amazon’s responses each time. Go2Lister manages the queue and waits patiently for Amazon response without interrupting progress of your scanning process.
- Recommended Method: It’s also advisable to stop and check all the books have been scanned in properly – I would recommend scanning around 5-10 books at a time for this. This approach ensures accurate results while also leveraging the speed of the software.
- Productivity: This way, you can get as many as 100 books listed in an hour. It increases productivity significantly once you get used to it.
Error Queue: This ensures any discrepancies in scanning are caught and remedied quickly, which helps to preserve the accuracy and speediness of your listing routine.
- Error Queue Functionality: If you are scanning an item that has an issue, such as needing approval or another problem, it will show up in the Error Queue. This feature helps in immediate identification and problems rectification.
- Handling Multiple ASINs: In some cases, scanning the book may return multiple ASINs. When this occurs, you are required to verify the book cover and okay it where necessary before matching it with the correct title in our system. This problem may happen in cases when you scan the wrong barcode, or if a book has multiple barcodes (so there is one on the inside and another on the back).
- Resolving Scanning Errors: For an entry that results in wrong or random information through a barcode, the best way is to remove the item from the Error Queue and rescan it. Be sure to scan the correct barcode, or else you’ll get wrong results.
- Simplicity of the Process: Notwithstanding such infrequent occurrences the process to rectify it is quite straight-forward. The error can often be resolved by resuscanning and you will be able to continue with the listing without much delay.
Ungating a product: This feature makes the process of applying for ungating simpler and more convenient, enabling you to expand the range of products that you can sell on Amazon.
- Applying for Approval: Go2Lister has an easy answer in the event you are gated or restricted to scan something within that particular category. Simply click on the ‘APPLY’ button next to the item in question.
- Seller Central Integration: After clicking ‘APPLY’ Go2Lister automatically opens Amazon Seller Central and enters ASIN of the gated item for you.
- Ungating Process:
- Auto Ungating: It may allow the item to be ungated immediately if it’s eligible for auto ungating.
- Manual Ungating: It also provides guidance for manual ungating.
- Invoice Requirement: If an invoice is needed for ungating, then Amazon will send a message to upload the specific invoice.
Cost/Profit
On Go2Lister, it is important to monitor and tweak the costs of your items as well as the profits you hope to make from these sales before finalizing a listing in the batch.
- Reviewing Total Profit and Cost: Before you submit your batch take a second to look over your total profit and how much you paid for items. This overview is to help you understand the income that can be generated from it.
- Checking for Profitability: As you scan the inventory, make sure it is priced for profit. As always, items that do not meet your profit threshold will appear in red.Also, if an item's rank is above your set preference, it will turn red, indicating it might take longer to sell.
- Special Attention to Certain Books:
- Purple Highlight: Books highlighted in purple indicate zero FBA (Fulfillment by Amazon) offers. For these, consider setting a higher price, especially for books with a rank under a million and more for those under 500,000.
- Low Rank: For books with a lower sales rank (indicating higher demand), don't hesitate to price higher to capitalize on their demand.
- Final Adjustments: Before sending out your batch, ensure each item is priced to yield a profit. Use the tool that shows how much money you make from each book and its sales rank to change prices smartly.
Looking at and changing the prices for your batch's items is important to make more money in your Amazon selling business. Go2Lister's tools make these changes easy and driven by data.
Send Batch: After you have gone through each item and made appropriate changes for profitability, everything is now set-to-finalize. Simply click on 'Send Batch'.
This action will send your batch to Amazon, finishing the process of listing things in this batch.
This part is very important because it moves your items into the Amazon system for selling.
Shipment Details:
There is a vital step that you would have to decide on when sending a batch to Amazon through Go2Lister – where Amazon is going to ship your products. Here's a guide on navigating this process:
- Warehouse Destinations: When you click the “Send Batch” button, CM will tell you which Amazon Warehouses your products are assigned for. Sometimes, Amazon may require you to send products to many warehouses.
- One Box Method: If Amazon assigns only one warehouse, use the 'One Box Method.' List enough items to fill one box, then click ‘Accept Shipments’ and finish your shipment. There's no need for Amazon Box contents specification as everything is in one box.
- Handling Splits:
Frequent Splits: In some regions, like California, you might experience frequent splits to different warehouses. If this happens, aim to make each split shipment at least a full box. This might require listing more items.
Previewing Shipments: If you preview shipments and notice small splits to multiple destinations, consider canceling, returning to the batch, and listing more items. This ensures each destination has enough items for a complete box.
- Accepting Shipments:
-With no splits, or if each split has enough for a full box, click on ‘Accept Shipments.’
-If you encounter a small split (like one item), you can manage it by copying its ASIN, canceling the shipment, and returning to the batch to remove that specific item. Then, list it in the next batch.
- Finalizing Shipments:
- After accepting the shipments, proceed to ‘Finish Box Content on Go2Lister’ for the next steps.
This process helps efficiently organize your shipments to Amazon, whether you're dealing with single or multiple warehouse destinations.
It’s about balancing the quantity of items and the logistics of shipping to different locations.
Finish Box Content on Go2Lister
Finalizing the 'Box Content' in Go2Lister is a key step in the shipment process to Amazon, especially when dealing with split shipments. Here's how to navigate this:
- Handling Split Shipments:
- In your case, there are two split shipments, each with one box.
- If multiple boxes are needed for a shipment, fill up the first box before adding more.
- Scanning and Organizing Books:
- Scan each book, and Go2Lister will show which box and shipment it belongs to.
- For instance, it might direct a book to Warehouse destination SCK4 in box one.
- Labeling Boxes:
- Label each box with the corresponding warehouse destination and box number. This helps keep your shipments organized.
- As you fill a box for one destination (e.g., GYR2), and it becomes full, start a new box for the same destination. Label this new box accordingly (e.g., GYR2 box number two).
- Continuing the Process:
- Continue scanning items and placing them in the appropriate boxes as indicated by Go2Lister.
- For each new item, Go2Lister will guide you in putting it in the correct box, depending on the space available and the destination.
- Finalizing Box Contents:
- Once all items are scanned and appropriately boxed, click on ‘Send Box Content.’
- This action finalizes the box contents for your shipment to Amazon.
This organized approach ensures your items are correctly distributed among the necessary boxes and shipments.
This makes the delivery process to Amazon's various warehouses smooth and efficient.
Box Weight, Length, Width, and Height
When finalizing your shipment in Go2Lister, accurately enter the box weight and dimensions. This is essential for efficient and cost-effective shipping. Here’s how to do it:
- Entering Box Weight:
- Record the weight of each box in your shipment. For example, if the first box weighs 21 lbs, input that.
- Aim to keep each box's weight above 30 pounds. Boxes under 30 pounds tend to incur higher shipping costs per pound.
- Box Dimensions:
- Input the length, width, and height of each box.
- A commonly used dimension is 12 x 16 x 12 inches. If your boxes differ in size, measure and enter their actual dimensions.
- Consistently using a standard dimension, like 12 x 16 x 12, has been found to be generally acceptable.
- Weight Considerations:
- Strive to get the box weight close to, but not exceeding, 50 lbs. Overweight boxes lead to significant penalties from Amazon.
- Avoid exceeding 47 lbs to stay within safe limits. Exceeding this weight might result in a hefty fine (around $50 to $150), suspension of shipping privileges for 24 hours, and other penalties.
- It's better to underestimate than to risk penalties for overweight boxes.
- Finalizing the Shipment:
- After entering the weights and dimensions for each box, click on ‘Submit’ to complete the process.
This meticulous approach to specifying box weights and dimensions helps avoid extra costs and complications with Amazon. It ensures a smooth shipping process.
Understand Your Profits with Go2Lister

Reports>Total Sales
Understanding your profits with Go2Lister involves a few key steps, focusing on sales, costs, and Amazon fees:
- Accessing Total Sales Report:
- Click on the ‘Total Sales’ tab in Go2Lister.
- This report will display your total sales and the costs of the products (provided you've accurately entered your buy cost during listing).
- Reviewing Costs and Fees:
- The report includes details of your total Amazon FBA fees. Note that these fees won't be included in this report if you’re doing Merchant Fulfilled (MF or FBM).
- The report aims to give an overview of FBA fees and buy costs versus sales. Future updates will include Merchant Fulfilled shipping fees.
- Understanding Total Profit:
- For those only using FBA, this report will show your gross profit - essentially, what you might need to pay taxes on, minus other expenses.
- Although not a substitute for professional CPA advice, this report can be valuable for your CPA for tax purposes.
- Downloading the Report:
- You can download this report for a detailed breakdown of your sales, costs, and total profit.
- Future Enhancements:
-Future versions of Go2Lister will have more in-depth reports. These reports will include inbound shipping fees, and Merchant Fulfilled shipping costs.
- Practical Use Case:
- This tool helps avoid the common pitfall of only seeing gross sales on the Amazon seller app without clearly understanding actual profits.
-For example, if Go2Lister shows a $34,000 profit for a month, after accounting for prep costs ($4,000) and shipping ($3,000 to $4,000), the actual profit would be approximately $26,000 to $27,000.
When utilized, the reporting feature provides you with a clearer picture of your business’s financial health. It is more than merely consumer statistics to know the real thing about profitability.
Reports>Orders
The 'Orders' tab under the 'Reports' section in Go2Lister is a valuable tool for analyzing your sales and profits on a per-item basis:
- Accessing Order Details:
- Press the 'Orders' button in the 'Reports' area on the left side of Go2Lister.
- This part has all the important details about every order.
- Understanding Your Sales:
- The report shows the sale price of each item, how much you paid for it in terms of costs and lastly what your profits were.
- This breakdown allows you to clearly see how much profit is made on each item sold.
- Making Informed Decisions:
- This knowledge allows you to make more informed decisions about your purchasing products and pricing them in the future.
- Price Updates:
- You can update your prices right in that tab.
- For example, if you update the price for a specific SKU, Go2Lister will remember this updated price that applies to future sales of that SKU.
- Note that changing prices here will affect the sale prices of future orders for those SKUs.
The 'Orders' report in Go2Lister shows a simple way to see how well your business is doing for each item.
This helps you improve your pricing plan and make better buying choices for more profit.
Conclusion
There are several key components to optimizing your Amazon listings like thorough keyword research, crafting great Amazon product description and using high-quality Amazon images.
Other than these critical components, the speed at which you upload your Amazon listings affects your achievement significantly.
Go2Lister is one of the best in this regard, enabling you to list your items incredibly fast and effectively on Amazon.
Thank you very much for taking the time to read this guide.
If you have any questions or need further guidance, feel free to contact Avery at support@go2lister.com.
Furthermore, there’s a wonderful Go2Lister Facebook group which is full of help and tips as well as creative ideas all accessible to you once registration with Go2Lister has been made.
If you found this guide helpful, sign up for Go2Lister from here.
This will not only support my efforts but it’ll also give you an extended trial to try out all of the software’s capabilities.
I look forward to seeing the success that Go2Lister.com brings to your Amazon listings!

Hey, I’m Steve
I'm just an average guy who reached a point in life where I grew weary of the corporate grind and decided to forge my own path.

Welcome to my website where I share my journey as an entrepreneur and offer support to those who aspire to start their own businesses and transform their lives, just like I did.
I understand the challenges and frustrations that come with breaking away from the traditional nine-to-five routine. That's why I created this platform – to provide inspiration, guidance, and practical tips to help you navigate the exciting world of entrepreneurship.


360 Bloomfield Ave, Suite 301,
Windsor, CT, 06095, United States
© Copyright 2026 | All Rights Reserved