
I’ve been selling on Amazon for almost 12 years. When I first started, I was much younger and had a full head of hair. A lot has changed since then, and thankfully my Amazon business has grown quite a bit too.
About two years ago, though, I ran into a major problem. My business was doing around $700,000 per year in sales and approximately $100,000 per year in net profit, but I wanted to grow and couldn’t figure out what was holding me back.
The reality was that I didn’t understand my numbers as well as I needed to.
I didn’t have a reliable system for seeing my true net profit, my actual margins, or which individual products were helping or hurting the business. I could have an item selling 50 or 60 times and generating a lot of revenue, but that didn’t necessarily mean it was making me money.
That’s where Sellerboard came into the picture.
I’ve now been using Sellerboard for more than two years, and this year I’m on pace to do almost $1.5 million in Amazon sales. It has given me much better visibility into my numbers and helped me understand what is actually happening inside my business.
In this tutorial, I’m going to show you exactly how I set up and use Sellerboard. This is designed specifically for complete beginners, so we’re going to start from scratch and work through the process step by step.
We’ll cover:
- How to sign up for Sellerboard
- How to connect your Amazon Seller Central account
- How to choose your starting date
- How to add your cost of goods
- How to track indirect business expenses
- How to understand your true net profit and margins
- How to analyze Amazon returns and fees
- How to track your business across different date ranges
- How to analyze the profitability of an individual ASIN
By the end, my goal is for you to have a much clearer picture of your Amazon business and the confidence to make decisions based on real numbers instead of guessing.
Watch full video below:
(Click Here to Watch on YouTube)
How Much Does Sellerboard Cost?
One of the first questions you’re probably wondering is how much all of this is going to cost.
At the time I recorded this tutorial, Sellerboard plans started at only $15 per month, which makes it pretty affordable compared with a lot of other Amazon software.
I also have a special Sellerboard offer for my audience. If you sign up for Sellerboard through my link, you can get:
- 60 days free instead of the normal 30-day trial
- No credit card required during the trial
- Access to additional bonuses and a mini-course from me to help you get set up
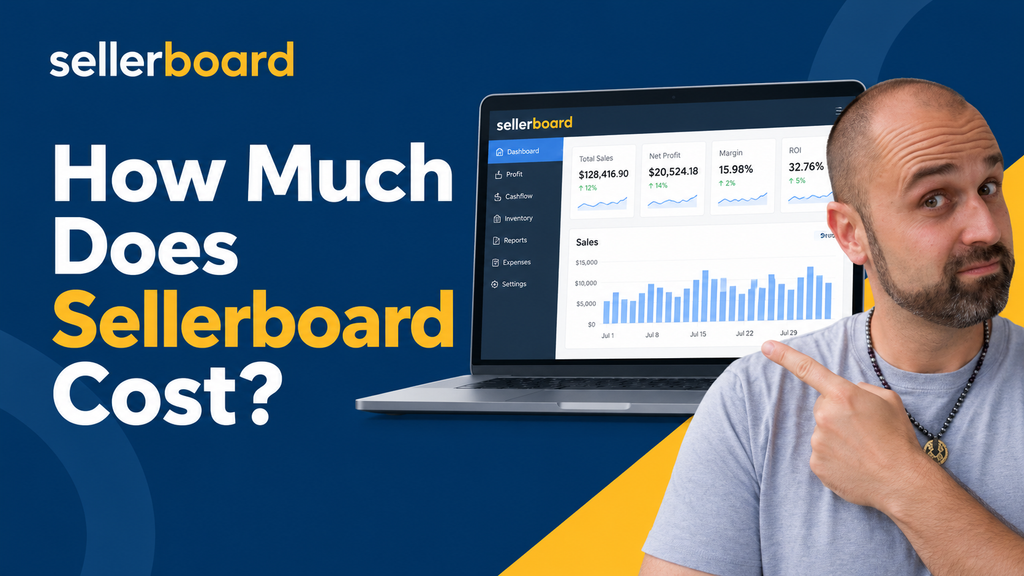
I especially like that you don’t have to enter a credit card. You can sign up, connect your Amazon account, start learning the software, and you don’t have to worry about forgetting to cancel and getting charged.
Once you sign up through my link, contact my support team with the email address you used for Sellerboard. Once we verify your signup, we’ll send over the additional bonuses.
Step 1: Connect Sellerboard to Your Amazon Seller Central Account
After creating your Sellerboard account, the first thing you need to do is connect it to Amazon.
Inside Sellerboard, go to:
Settings → General → Selling Partner API
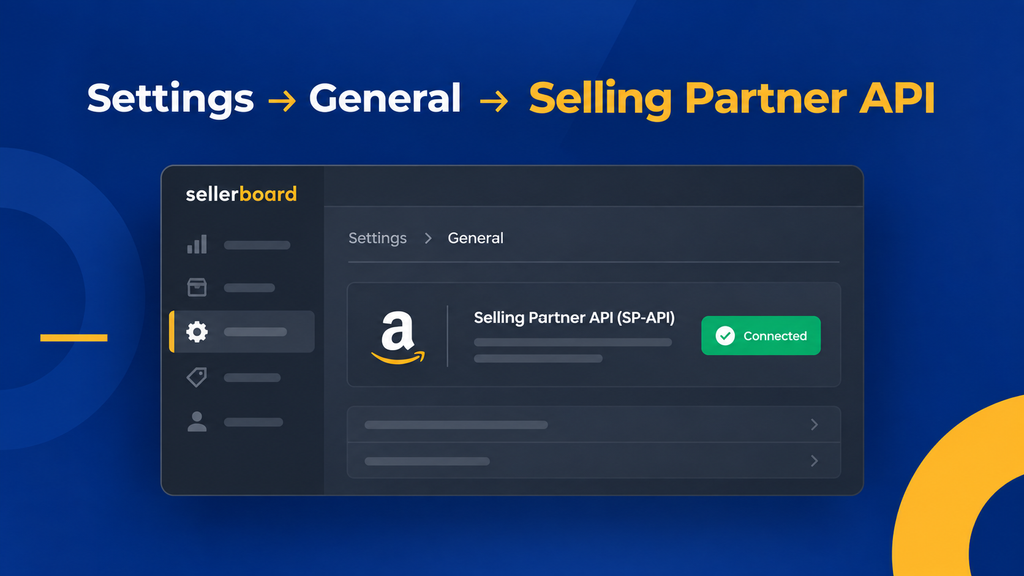
Sellerboard will then prompt you to integrate your Amazon Seller Central account. This is extremely important because it’s how Sellerboard gets access to the information it needs to analyze your business.
Once connected, Sellerboard can start pulling in data such as:
- Orders
- Sales
- Refunds
- Amazon fees
- Fulfillment fees
- Other Amazon-related transaction data
This integration is the foundation for everything else we’re going to do.
Depending on the size of your Amazon account, it may take some time for everything to populate. I would give Sellerboard approximately 24 to 48 hours after connecting your account before expecting all of your information to be available.
So if you’re following along with the tutorial, connect your account first. Then come back once your data has had time to populate.
Step 2: Choose Your Sellerboard Start Date
Once your Amazon data has been imported, the next decision is choosing your start date.
Sellerboard can automatically pull a huge amount of information from Amazon, but there are still certain numbers that you have to provide yourself. The biggest one is your cost of goods, or COGS, because Sellerboard has no way of automatically knowing what you paid for each product.
You’ll also need to enter business expenses that Amazon doesn’t know about, such as:
- Virtual assistants
- Software
- Bookkeeping
- Prep centers
- Other operating expenses
Because of that, you need to decide how far back you want your Sellerboard numbers to be accurate.
When I recorded this tutorial on September 10, 2026, an example start date might have been January 1, 2026. If I chose January 1, I would need to make sure my cost of goods and indirect expenses were properly entered from January 1 forward.
You could theoretically go back further, but that means more work. There may also be limitations on how far back Sellerboard can pull certain Amazon data.
The important thing to understand is that if your cost of goods and indirect expenses aren’t entered for a particular period, your profit and margin numbers for that period aren’t going to be accurate.
For a beginner, starting with the beginning of the current year can be a practical place to begin.
Step 3: Add Your Cost of Goods
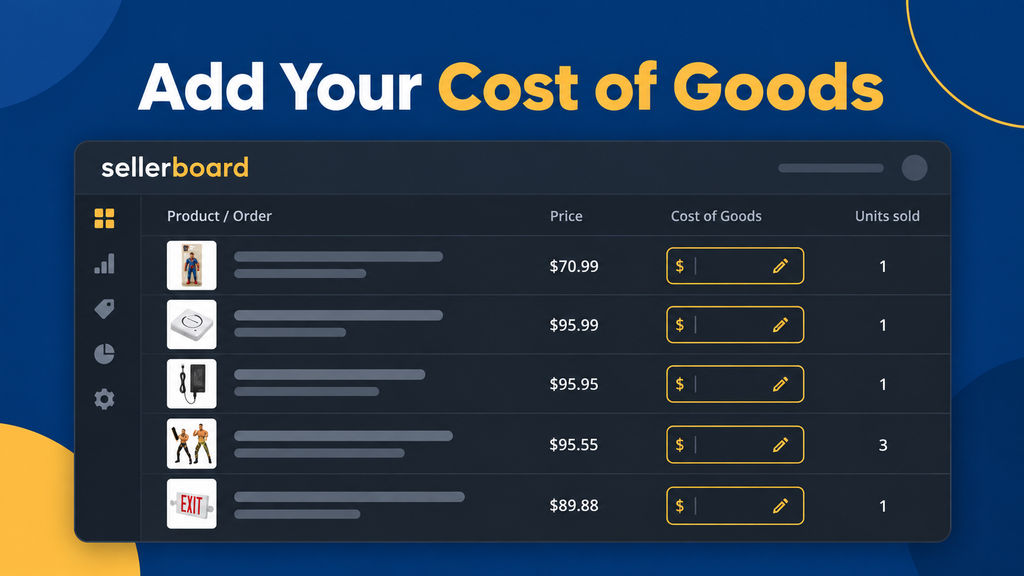
This is probably one of the most important parts of setting up Sellerboard.
If Sellerboard doesn’t know what you paid for your inventory, there’s no way for it to accurately calculate your true profit or margins. You have several options for getting your cost of goods into the software.
Option #1: Enter Your Cost of Goods Manually
The first method is updating COGS manually from your orders.
Go to:
Dashboard → Ordered Items
Choose the date range you want to work with and scroll through your orders. You’ll see a field labeled COGS, which stands for cost of goods sold.
If you know what you paid for the item, simply click the COGS field, enter your cost, and Sellerboard will update it. For example, if I paid $36 for a product, I would enter $36 as the cost of goods.
One thing that makes this easier in my business is that we include the buy price inside our custom SKU. When I’m looking at an order, I can quickly see what we originally paid for the item.
If you haven’t been tracking your buy prices somewhere, you may have to do some additional work to determine your historical costs. It’s not necessarily the fun part of the setup process, but it’s important if you want accurate numbers going forward.
Option #2: Update COGS Through the Inventory Planner
You can also update your cost of goods through Sellerboard’s inventory section.
Go to:
Inventory → Planner
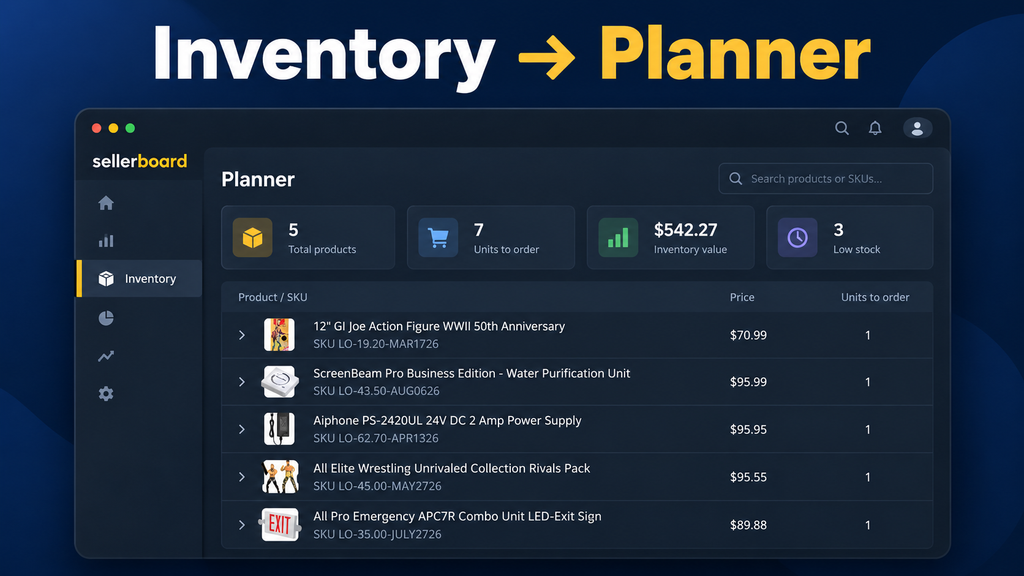
Personally, I like to hide out-of-stock products so I’m only looking at inventory that is currently selling. From there, you can review individual products and update the cost of goods.
Option #3: Bulk Import Your Cost of Goods
Sellerboard also gives you the ability to bulk import cost-of-goods information through a CSV.
I personally haven’t used this method because my team went through our products manually. However, Sellerboard has a tutorial explaining how you can upload a spreadsheet containing your ASINs and cost information instead of updating every product one at a time.
If you have hundreds or thousands of products to update, this could potentially save you a lot of time.
Sellerboard's bulk COGS import tutorial
You’ll need to format the appropriate columns and import the information into Sellerboard’s product area. A couple of friends of mine have gone through this process recently and told me it was pretty seamless.
No matter which method you choose, get your cost of goods updated before moving too far forward. Your profitability data depends on it.
Step 4: Add Your Indirect Business Expenses
Once your cost of goods is updated, the next major step is entering your indirect expenses.
These are expenses that Sellerboard can’t automatically pull from Amazon because they happen outside of Amazon. They still affect your bottom line, so you need to account for them if you want to understand your true profitability.
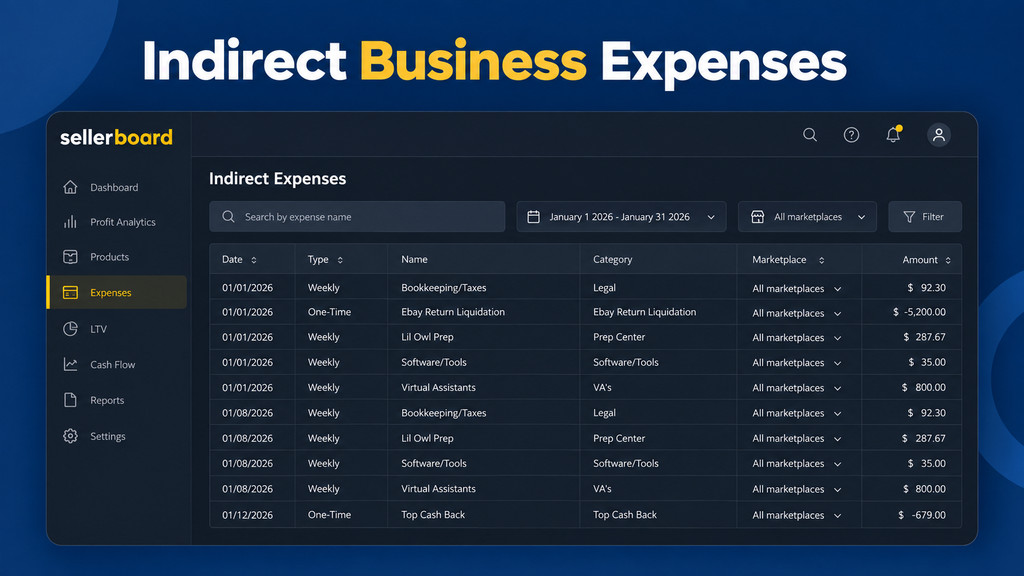
For my business, indirect expenses include things such as:
- Bookkeeping and taxes
- Virtual assistants
- Software and tools
- Prep center expenses
This is an important distinction.
Amazon might show you sales, fees, refunds, and a bunch of other information, but Amazon doesn’t know that you paid a virtual assistant $1,500 or that your prep center charged you $2,000. If you ignore those costs, your business can look significantly more profitable than it really is.
Sellerboard gives you a place to account for those expenses.
How I Enter Recurring Expenses Into Sellerboard
When you add an indirect expense, Sellerboard allows you to choose how often that expense should occur.
You can set an expense as:
- One time
- Daily
- Weekly
- Monthly
- Quarterly
- Annually
For many of my recurring business expenses, I personally prefer using weekly expenses.
Let’s say I expect my prep center to cost approximately $2,000 for the month. If I enter the entire $2,000 as a one-time expense on the first day of the month and then check Sellerboard on the seventh day, my profit could look artificially low because the software has already subtracted the full month’s expense.
Instead, I can spread that cost throughout the month. I might have approximately $500 per week deducted, which gives me a more realistic picture when I check my numbers in the middle of the month.
You could take this even further and divide a monthly expense into a daily amount. If an expense is $2,000 per month, you could divide it by 30 and have Sellerboard account for a portion of that expense every day.
There isn’t necessarily one perfect way to do this. The goal is to choose a method that gives you useful numbers when you’re reviewing your business throughout the month.
I generally prefer weekly.
You Can Also Add Outside Income
The indirect expenses section can also be used to account for additional income that Amazon doesn’t know about.
For example, I sometimes receive income from cashback programs or from liquidating Amazon returns. If I send unsellable returns to someone who resells them on eBay and pays me for those products, that income isn’t going to appear automatically in my Amazon reports.
Sellerboard gives me a way to account for that money.
Ultimately, the purpose of this section is to get as close as possible to the true financial picture of your business. That means accounting for money leaving the business as well as relevant income coming in from sources Amazon can’t see.
Why Your COGS and Indirect Expenses Matter So Much
Sellerboard automatically gets a huge amount of information from Amazon. What it doesn’t automatically know is what you paid for your inventory and what you’re spending outside of Amazon.
Those two categories are critical:
1. Cost of goods
2. Indirect expenses
Once those numbers are entered accurately, Sellerboard can give you a much clearer view of your net profit, net margin, ROI, refund costs, Amazon fees, and overall business performance.
For example, I can go into my dashboard and look at a single day. In the example from my tutorial, Sellerboard showed that I made $1,344 in profit the previous day.
I can also zoom out and look at an entire month. One month shown in the tutorial had approximately $154,000 in sales, 111 refunds, and around $29,000 in net profit.
Those numbers are useful because they account for far more than simply looking at gross Amazon sales.
Step 5: Learn How to Use the Sellerboard Dashboard
Once your setup is complete, the dashboard is where Sellerboard starts becoming extremely useful.
At the top of the dashboard, you can choose different periods and filter your business data. This lets you quickly review how you’re performing across different time frames without manually putting reports together.
You might want to look at:
- Today
- Yesterday
- The last 7 days
- The last 14 days
- This month
- This quarter
- Last quarter
- A completely custom date range
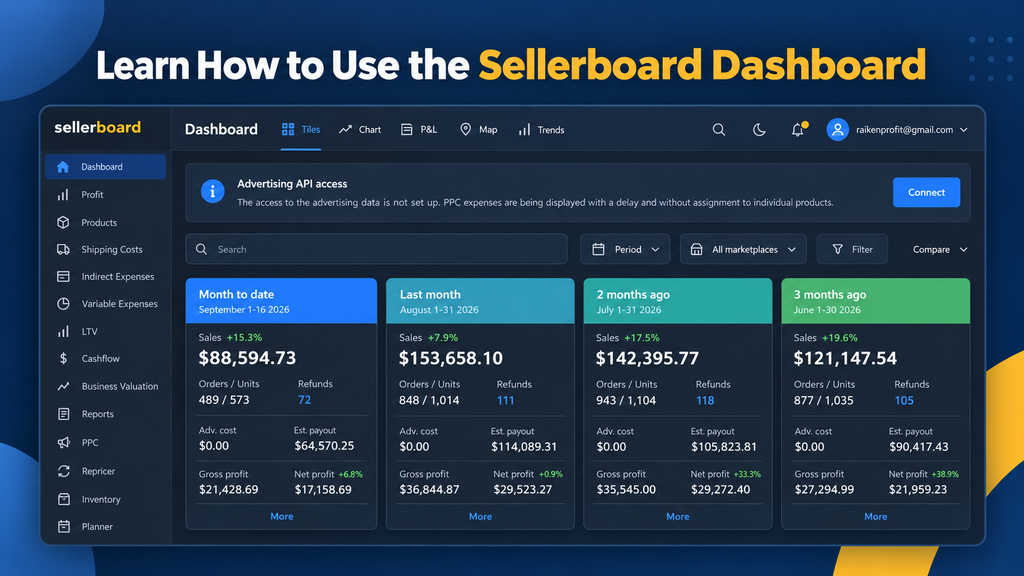
You can also compare different periods.
For example, I can look at the current quarter and compare it against the previous quarter. In the example shown in my tutorial, I could see that I had sold 2,440 units so far that quarter and had 271 refunds. I could then compare those numbers with the prior quarter, when I had done more than $339,000 in sales.
That makes it much easier to understand whether different areas of the business are improving or moving in the wrong direction.
Just remember that your profitability metrics are only as accurate as the information you’ve entered. If your cost of goods or indirect expenses are wrong, your final numbers will be wrong too.
Step 6: Analyze Your Amazon Fees
When you click More inside the Sellerboard dashboard, you can dig much deeper into what’s affecting your profitability.
This is one of my favorite parts of the software because Amazon has so many different fees. Trying to manually track every one of them through Amazon’s business reports would take a tremendous amount of time.
Sellerboard organizes those expenses for you.
Depending on your business, you can see information related to:
- Referral fees
- FBA per-unit fulfillment fees
- Shipping to Amazon
- Convenience fees
- Clawbacks
- Refund costs
- Variable closing fees
- Restocking deductions
- Refunded referral fees
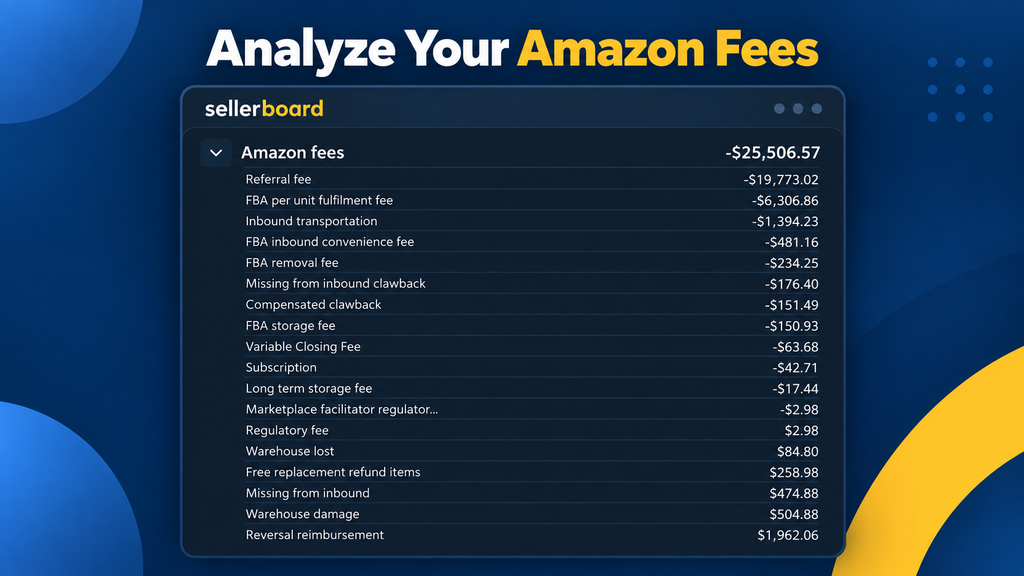
There’s a lot happening behind the scenes in an Amazon business, and some of the numbers can be eye-opening.
In one quarter shown in my tutorial, I had paid approximately $17,000 in referral fees, more than $2,300 in shipping to Amazon, and over $1,000 in convenience fees.
I want visibility into those numbers because every one of those expenses affects the profitability of the business.
Step 7: Understand What Your Returns Are Really Costing You
Returns were one of the biggest problems I was dealing with before I started paying closer attention to my numbers.
Sellerboard lets you get much more granular with your return data. Instead of simply knowing that a refund occurred, you can start understanding what happened financially after the return came back.
You can see information such as:
- Total refunds
- Sellable returns
- Unsellable returns
- Returned product costs
- Refund-related fees
- The value of returned inventory
This is important because not every return affects your business the same way.
If a customer returns an item and that product is still sellable, you still have inventory that can potentially be sold again. If the product comes back unsellable, that’s a completely different financial outcome.
When I looked at approximately one year of my data during this tutorial, my overall refund rate was 11.27%. Approximately 31% of my returned products were sellable, meaning close to 70% ultimately had to be liquidated through my eBay connection.
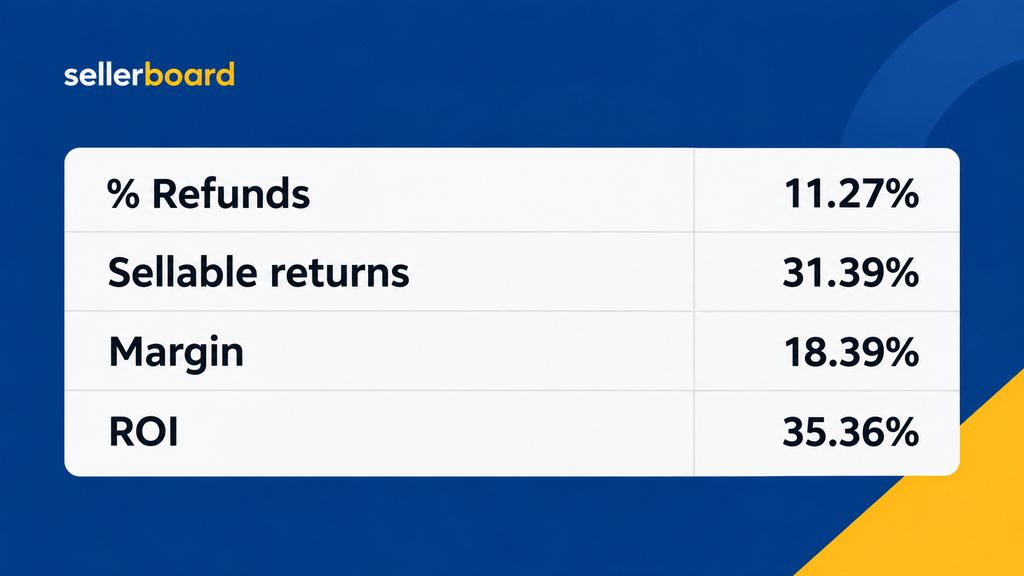
Seeing those numbers gives me a much clearer understanding of what returns are actually doing to my business.
Step 8: Reconcile Your Expenses at the End of the Month
Some business expenses won’t be exactly the same every month, so I’ll often start with an estimate and then reconcile the numbers later.
My prep center is a good example. At the beginning of the month, I might estimate what I expect to spend and have Sellerboard deduct that estimated amount weekly.
Once the month ends and I know the actual amount, I go back and update it.
Maybe I estimated $300 for an expense and actually spent $200. Maybe my virtual assistant costs increased because I paid bonuses. My prep center could also come in a little higher or lower than expected.
Sellerboard allows you to select the appropriate date range, edit those expenses, and replace the estimates with the actual numbers. Those changes then flow through to your dashboard and adjust your profit and margins.
That’s how I keep my numbers as accurate as possible without having to know every final expense on the first day of the month.
Step 9: Analyze Profitability on an Individual ASIN
This might be one of the most valuable things I do inside Sellerboard.
You don’t only want to know if your overall business is profitable. You also need to understand which individual products are actually making you money.
My business primarily involves buying products on eBay and flipping them on Amazon. When my team finds an item that we’ve sold before, I can take that ASIN and look it up inside Sellerboard to see exactly how it has performed over a specific date range.
For example, in the tutorial I looked at a Lexmark toner product that I had sold five times over approximately one year. Sellerboard showed that I had generated around $229 in net profit, had zero refunds, and earned approximately a 25% net margin on that product.
I could also see:
- Revenue
- Amazon fees
- Cost of goods
- Refunds
- Net profit
- Net margin
That information helps me decide whether I should buy the product again and, just as importantly, how much I should be willing to pay for it.
A Product Can Sell Well and Still Be a Bad Buy
This is one of the biggest lessons I’ve learned from having better access to my numbers.
You can’t judge a product simply by how often it sells or how much revenue it generates. Maybe you’ve sold something 50 times and it looks like an amazing replenishable product on the surface.
But what if the refund rate is extremely high? What if you’re only making an 11% margin when your goal is at least 20%?
You could be putting a lot of capital and effort into an item that isn’t nearly as profitable as you thought.
That’s why my team looks at historical Sellerboard data when we’re considering purchasing products that we’ve sold in the past.
A Real Example From My Business
I shared another product during the tutorial that I had sold 38 times over approximately one year.
The product generated around $2,826 in revenue, and there were no refunds. My Amazon fees were approximately $610, while my cost of goods was almost $1,700.
After everything, the product’s net margin came out to just under 19%, with approximately a 31% ROI.
That isn’t terrible, but I generally want my net margin to be above 20%. Looking at the data told me that my team may need to pay a little less for this product going forward.
If we could reduce our purchase price by approximately 5% to 10%, the opportunity could become more attractive.
Without looking at the numbers, we might simply see 38 sales and assume it’s an amazing replenishable product. Sellerboard gives us a much more complete picture.
One Important Limitation
There is one important thing to understand when you’re looking at individual ASIN profitability.
The product profitability view does not account for your indirect expenses. That means it isn’t a perfect representation of every single cost associated with running your business.
You need to keep that limitation in mind when reviewing individual products. Even so, I still find the ASIN-level data extremely useful when making sourcing decisions.
Sellerboard Isn’t a Replacement for Understanding Your Business
Sellerboard gives you access to a massive amount of information, but the software is only as useful as the data you give it.
It can automatically pull your Amazon orders, fees, refunds, and other Amazon-related information. You still need to make sure you’re accurately tracking your inventory costs and the indirect expenses that happen outside Amazon.
Once you do that, you can start answering some of the most important questions in your business:
- How much money did I actually make yesterday?
- What was my true margin last month?
- How much are returns costing me?
- Which products are making the most money?
- Which products look successful but are actually hurting my profitability?
Those are the kinds of questions that have given me much better visibility into my own Amazon business.
Is Sellerboard Worth It?

From my firsthand experience, Sellerboard has been a game changer for my business.
I understand that adding another system can feel like extra work. You have to track your cost of goods, enter expenses, and make sure the information stays updated.
But if you don’t know your numbers, you don’t have real visibility into what’s happening.
There can be areas of the business where you’re losing money without realizing it. You can have strong sales and still have certain products, return problems, expenses, or fees quietly eating away at your profit.
For software starting at approximately $15 to $20 per month at the time of this tutorial, I personally consider the visibility Sellerboard gives me extremely valuable.
Get a Free 60-Day Sellerboard Trial
If you want to test everything I’ve covered in this tutorial, you can start your free 60-day Sellerboard trial here.
When you use my link:
- Your trial is extended from 30 days to 60 days
- No credit card is required
- You can contact my support team after signing up to receive my additional mini-course and bonuses
Give yourself some time to connect your Amazon account, update your cost of goods, add your indirect expenses, and start learning what the numbers are telling you.
Knowing those numbers has made a massive difference in the way I run my business.
Sellerboard Beginner FAQ
What is Sellerboard?
Sellerboard is a tool I use to track the financial performance of my Amazon business. It pulls in Amazon data and allows me to combine that information with my cost of goods and indirect business expenses so I can get a clearer picture of metrics such as net profit, margin, ROI, fees, and refunds.
How much does Sellerboard cost?
At the time I recorded this tutorial, Sellerboard plans started at approximately $15 per month.
Does Sellerboard have a free trial?
Yes. Through my Sellerboard free-trial link , you can receive 60 days free instead of 30 days, and the trial does not require a credit card.
How long does it take Sellerboard to import Amazon data?
After connecting your Amazon Seller Central account through the Selling Partner API, I recommend allowing approximately 24 to 48 hours for everything to populate, especially if you have a larger account.
Does Sellerboard automatically know my cost of goods?
No. You need to provide your cost of goods so Sellerboard knows what you actually paid for the inventory you’ve sold.
You can enter COGS manually, update products through the inventory planner, or use Sellerboard’s bulk import process.
Can I bulk upload my cost of goods?
Yes. Sellerboard has a CSV import option that allows you to import product and cost information in bulk.
I personally updated my products manually, so I recommend following Sellerboard’s instructions if you want to use the bulk import feature.
What are indirect expenses in Sellerboard?
These are expenses Amazon doesn’t automatically know about. Examples from my business include virtual assistants, software, bookkeeping, taxes, and prep center costs.
Sellerboard allows you to include these expenses so they can be factored into your overall business profitability.
Should I enter expenses daily, weekly, or monthly?
Sellerboard gives you multiple options. I personally like using weekly expenses for many recurring costs because it spreads the expense throughout the month instead of deducting the entire monthly amount at once.
You could also use daily, monthly, quarterly, annual, or one-time expenses depending on the situation.
Can Sellerboard track Amazon returns?
Yes. Sellerboard allows you to see information related to refunds, sellable returns, unsellable returns, returned product costs, and other return-related expenses.
This has been especially useful for me because returns can have a major impact on profitability.
Can Sellerboard show profit for one specific ASIN?
Yes. You can enter an ASIN, choose a date range, and analyze how that specific product has performed.
You can see information such as revenue, units sold, refunds, Amazon fees, cost of goods, net profit, and margin.
Important: The individual ASIN profitability view does not account for your indirect expenses.
Why is my Sellerboard profit inaccurate?
One of the first things I would check is whether your cost of goods and indirect expenses are entered correctly.
Sellerboard can pull a lot of data automatically from Amazon, but it doesn’t know what you paid for your inventory or what you’re spending on outside business expenses unless you provide that information.
Final Thoughts
For years, I was able to grow an Amazon business without having the level of visibility that I have today. Eventually, that started holding me back because revenue and units sold only tell part of the story.
You need to understand what you’re actually keeping after inventory costs, Amazon fees, returns, and the expenses required to operate your business. You also need to know which products are truly performing well and which ones may look great on the surface but aren’t producing the margins you want.
That’s what Sellerboard has helped me do.
If you’re brand new, don’t feel like you need to understand every feature immediately. Connect Amazon, choose your starting date, get your cost of goods entered, add your indirect expenses, and then start using the dashboard to learn what your business is actually doing.
If you want to follow along with this tutorial, you can get your free 60-day Sellerboard trial here.
Once your numbers are accurate, you can start making decisions based on what is actually happening inside your business instead of guessing.
This version should read much more like an established blog publication. The shorter paragraphs are still there where emphasis helps, but they’re now the exception rather than the default.

Hey, I’m Steve
I'm just an average guy who reached a point in life where I grew weary of the corporate grind and decided to forge my own path.

Welcome to my website where I share my journey as an entrepreneur and offer support to those who aspire to start their own businesses and transform their lives, just like I did.
I understand the challenges and frustrations that come with breaking away from the traditional nine-to-five routine. That's why I created this platform – to provide inspiration, guidance, and practical tips to help you navigate the exciting world of entrepreneurship.






360 Bloomfield Ave, Suite 301,
Windsor, CT, 06095, United States
© Copyright 2026 | All Rights Reserved